How to Install WordPress on Localhost XAMPP
Install WordPress in localhost: It allows you to create and test your website before publishing it online. This can be especially useful for website developers, designers, and content creators who want to experiment with different themes, plugins, and customizations without affecting the live version of their website. In this article, we will guide you through the process of installing WordPress on a local host using Windows.
Why Install WordPress on Localhost?
In today’s time, it is quite common to install WordPress on a local server. Website developers often start any major website on localhost only.
You do not need any domain and hosting to design a website on Local Server. In local websites, you can test different themes, plugins, settings, etc. without any fear. This website will be visible only in your computer. When you feel that your website is completely ready, then you can make it live.
With this, if WordPress is new to you, then you can learn a lot by creating a local website. Many bloggers and website owners keep a copy of their website on the local server. After this, whenever they have to install a new plugin or make major changes, first they do it on localhost and later they make the changes live.
To install WordPress in localhost XAMPP, you can follow these steps:
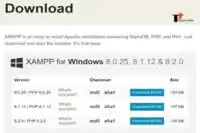
- Download XAMPP from https://www.apachefriends.org/download.html and install it on your computer.
- Download the latest version of WordPress from https://wordpress.org/download/ and extract it to your local machine.
- Start XAMPP and start Apache and MySQL modules.
- Create a database for WordPress. You can do this by opening a web browser and going to http://localhost/phpmyadmin/. Then, click on the “Databases” tab, enter a name for your database, and click “Create”.
- Copy the extracted WordPress files to the “htdocs” folder under XAMPP’s installation directory. For example, if you have installed XAMPP in “C:”, then the path to “htdocs” would be “C:\xampp\htdocs”.
- Rename the “wp-config-sample.php” file to “wp-config.php“.
- Open the “wp-config.php” file and enter your database information. This includes the database name, username, password, and host.
- In your web browser, go to http://localhost/[wordpress-folder-name]/ and complete the setup process. This involves choosing a language, entering your site title, creating an admin account, and other basic information.
- Once you have completed the setup process, you can log in to your WordPress dashboard at http://localhost/[wordpress-folder-name]/wp-admin/.
You have now successfully installed WordPress in localhost XAMPP Server.
Read Also: 5 Easy Steps: Chat GPT for keyword research and SEO
Install WordPress in Localhost xampp
Step 1:

Install WordPress in localhost
Download and Install XAMPP The first step in installing WordPress on a localhost is to download and install XAMPP, a free, open-source software that includes Apache, PHP, and MySQL. XAMPP allows you to run a web server on your local computer, making it possible to run and test WordPress without an internet connection.
Step 2:
Start the Apache and MySQL Modules Once you have installed XAMPP, launch the XAMPP Control Panel and start the Apache and MySQL modules. This will start the web server and database server, respectively, on your local computer.
Step 3:
Download WordPress Next, visit the WordPress website and download the latest version of WordPress. Once the download is complete, extract the contents of the ZIP file to your localhost folder (usually C:\xampp\htdocs).
Step 4:
Create a Database Now that you have installed XAMPP and WordPress, it’s time to create a database for your WordPress website. To do this, open your web browser and navigate to http://localhost/phpmyadmin/. This will open the PHPMyAdmin interface, where you can create a new database for your WordPress website.
Step 5:
Install WordPress Once you have created a database, it’s time to install WordPress. To do this, open your web browser and navigate to http://localhost/wordpress (or the name of the folder where you extracted the WordPress files). This will start the WordPress installation wizard, which will guide you through the process of setting up your website.
Step 6:
Configure WordPress During the installation process, you will be asked to enter information about your database, website, and admin account. Fill in the required information, including the database name, username, password, and table prefix, and click on the “Submit” button.
Step 7:
Complete the Installation Once you have entered the required information, click on the “Run the installation” button. WordPress will now install and configure itself on your localhost, creating the necessary tables and setting up your website.
Step 8:
Log in to WordPress Once the installation is complete, you can log in to your WordPress website by navigating to http://localhost/wordpress/wp-
In conclusion, installing WordPress on a localhost using Windows is a straightforward process that can be completed in just a few simple steps. By using XAMPP and following the steps outlined in this article, you can create and test your website locally before publishing it online, giving you complete control over the design and functionality of your website.


Pingback: Do You Want to Know How to Create Free Blog Website in 2024
Pingback: The Ultimate Guide to Digital Marketing | Technosafar
Pingback: The Ultimate Guide to Digital Marketing | Technosafar