How to Use Google Analytics
How to – If you are a blogger or digital marketer, then you must have heard about Google Analytics, it is a tool created by Google through which you can track every visitor to your blog and website which Can monitor traffic, so here we get to know Connect Blog to Google Analytics.
But for traffic measurement of your blog through Analytics, it is very important to connect the blog with this tool, only then you will be able to measure the traffic of your blog.
Many new bloggers and marketers do not know much about this tool, so they face a lot of difficulties in connecting their blogs to Analytics. If you are also facing any kind of problem in connecting your blog to Analytics, then definitely read this article till the end.
So let’s start this article without taking much of your time and first of all, know what is this tool.

What is Google Analytics?
It is a tool created by Google, through which blogger or marketer can measure the traffic of his or his client’s website and on the basis of that traffic can be increased by making necessary changes in the website.
This tool is a part of Google Marketing Platform, any user can use this tool for free through Gmail ID. It is used for Search Engine Optimization and marketing purposes.
Every single traffic coming to the blog can be tracked using this tool, as well as you can check Real Time traffic in your blog through this tool.
This tool is very beneficial for a marketer, there are many types of facilities available in it such as –
You can track Real Time traffic on the blog.
How many users are coming on which webpage, for how long users are staying on the webpage, bounce rate of the blog can get this information.
From which source the traffic is coming in the blog, like Organic, Social, Direct, Referral, you can track all this.
You can track the age, gender, location etc. of the people visiting the blog.
Apart from this, there is a lot in this tool, like – as you use this tool, you will understand things in a better way.
What is Google Analytics 4?
Google launched Google Analytics 4 in October 2020, upgrading this tool. Its work is also to do traffic measurement, but it has some additional features. Since this is the updated version now everyone is switching to GA4.
Although Google has not removed Google Analytic Universal (the old version of GA) yet, you can also use GA – U. you should also start learning GA – 4 because Google will stop GA – U forever after July 2023.
Following are some of the features of Google Analytics 4 –
You can track both mobile application and website traffic in GA4 through a single account.
Data is presented by Event in GA4.
GA4 has the facility of Stream instead of Views and Segment present in the old Universal version.
The way of doing data measurement in GA4 is very different from GA-U.
Google Analytics Metrics
- Sessions: The number of times users have visited your website.
- Pageviews: The total number of pages viewed on your website.
- Bounce rate: The percentage of users who leave your website after viewing only one page.
- Time on page: The average amount of time users spend on each page of your website.
- Conversion rate: The percentage of users who complete a desired action on your website, such as making a purchase or filling out a form.
- Revenue: The total amount of revenue generated from e-commerce transactions on your website.
- Traffic sources: The channels that drive traffic to your website, such as search engines, social media, or referrals.
Benefits of google analytics
- Audience insights: This tool provides detailed information about your website visitors, including their location, demographics, interests, and behavior on your site. This information can help you better understand your target audience.
- Traffic analysis: This tool tracks your website’s traffic sources, including search engines, social media, and referrals.
- Goal tracking: This tool allows you to set up and track goals for your website, such as form submissions or product purchases.
- E-commerce tracking: If you have an e-commerce website, this toolcan provide valuable insights into your sales and conversion rates. This information can help you identify which products are selling the most and which pages.
- Custom reporting: this tool allows you to create custom reports and dashboards to track the metrics that matter most to your business.
Google Analytics Ecommerce
Some of the key features of Google Analytics Ecommerce include:
- Sales tracking: This tool Ecommerce allows you to track your online sales and revenue, including the total number of transactions, revenue per transaction, and total revenue.
- Product performance: You can use this feature to track how well individual products are selling, including the number of units sold, revenue generated, and average order value.
- Shopping behavior analysis: This feature provides data on how customers interact with your online store, including the number of sessions that include product views, cart additions, and checkout initiations.
- Checkout behavior analysis: You can use it to track how customers move through the checkout process, including the number of abandoned carts and the time it takes customers to complete the checkout process.
- Conversion tracking: It allows you to track conversions based on a variety of factors, including the source of the traffic, the type of device used, and the location of the customer.
How to connect Blog to Google Analytics?
We have told you the complete process of connecting the blog to Google Analytics further in this article. In this article, we have taught you to connect the website to both Google Analytics Universal and the new version of Google Analytics GA-4.
Before connecting the blog to Google Analytics, keep one thing in mind you must have a Gmail ID. Create an account in Google Analytics with the same Gmail ID through which you have created an account in Google Search Console.
#1 – Open Google Analytics website
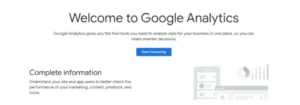
First of all, search by typing Google Analytics on your browser and open the official website of Google Analytics, and sign in with your Gmail ID.
As soon as you sign in to Google Analytics through Gmail ID, the interface will open in front
of you according to the image given below, here you click on the option of Start Measuring.
#2 – Setup Account
After this, the form of Account Setup will open in front of you. Here you can enter any name in the box with Account Name. You enter the name of your website, it will be better.
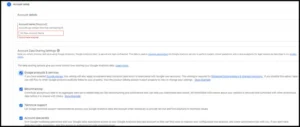
After filling the account name, you have to click on the option of Next below.
#3 – Setup the property
After this, the page Property Setup will open in front of you. On this page, you have to fill in the following information.
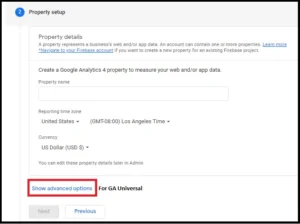
- Property Name – In this column, you can add the same name which you have given in Account Name.
- Country – Select your country here. If you live in India then select India.
- Time – You have to select India’s Time Zone here.
- Currency – If you are from India then select INR.
Keep in mind that you do not have to click on Next now.
#4 – Select Google Analytics Version
Below this form, you will get the option of Show Advance Option, click on it.
If you want to use Google Analytics Universal (GA-U), which is the old version of analytics, then turn on the option Create a Universal Property.
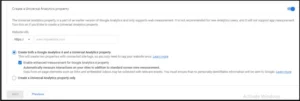
Below you will see two options,
- If you want to use both GA – U and GA – 4 together, then select the former option.
- If you want to use Google Analytics Universal only, click on the option below.
- And if you want to use only Google Analytics 4, then leave the option of Create a Universal Property Off.
- If you want to use GA-U, then enter the URL of your website as well.
- I suggest you use only Google Analytics 4 because it is an updated version, and Google has added many new things to it.
You can select the version of Google Analytics as per your convenience and then click on the option of Next. Here we are teaching you to connect websites in Google Analytics 4, the same process is also for GA-U.
#5 – Fill Business Information
After this, the page Business Information will open in front of you, here you have to fill in some information about your business.
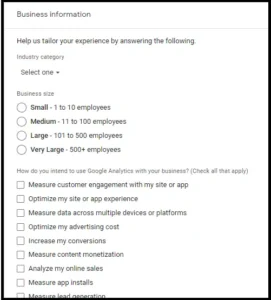
Industry Category – Select the category under which your website comes.
Business Size – Select how many employees are there in your business. If you are a blogger and manage your blog alone then select Small 1 – 10 Employees.
After this, read the options given here carefully and select the options which you want to measure on your website.
After filling in all this, you have to click on Create option.
#6 – Accept the Terms & Conditions
After this, tick the box to accept the Terms & Conditions of Google Analytics and click on the I Accept option below. You can also read this if you want.
After this, the page of Email Communication will open in front of you, in which Google Analytics will ask you what things you want to receive in your email. Tick whatever you want to receive in your email, and click on the Save option.
#7 – Select Platform
After this Google Analytics will ask you the platform, in this, you will get the option of iOS, Android App, and Web. Select the platform for which you are registering Google Analytics.

Since in this article, we are talking about Blog Ko Google Analytics Se Kaise Jode, then select Web here.
#8 – Enter the URL of the website
After this, you have to enter the URL of your website for which you are creating Google Analytics. And Stream Name you can name anything, you can also enter the name of your website in Stream Name.
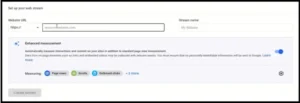
You should turn on the option of Enhance Measurement, this will give you the advantage that you will not have to enter the tracking code to track any event on your website. After doing all this, you have to click on the Create Stream option.
#9 – Get Tracking Code
After clicking on Create Stream, a new page will open in front of you, in which all your Detail Show will be there. Your work is not done yet, to measure the traffic of your website, you have to paste the code of Analytics in the Head Section of your website.
If you use Google Tag, then by copying the Measurement ID, you can implement Google Analytics in your website through Google Tag manager.
But if you do not use Google Tag manager, copy the Global Site Tag. It is easier for a new blogger to use the Global Site Tag. That’s why we will tell you to implement Google Analytics in the website through Global Site Tag.
#10 – Paste the code into your blog
This is the last step, you have to paste the Global Site Tag in the Head Section of your blog. Only then Google Analytics will be able to track your website traffic.
How to Add Analytics Code on Blogger
If your blog is on Blogger then you follow the following process.
- First login to Blogger Dashboard.
- Click on the Theme option.
- Click on Edit HTML.
- Find the <head>.
- Paste the code just below the <head> section and click on the Save option.
So in this way, you can apply Google Analytics code in Blogger, and measure your website traffic.
How to add Analytics code in WordPress
If your blog is on WordPress then follow the following easy process to add Google Analytics code to your blog.
- First login to the WordPress dashboard.
- After this, click on Add New in the section with Plugin.
- Install the Insert Header and Footer plugin.
- Open the plugin.
- Paste the code in Head at the top and click on Save.
In this way, you can easily add Analytics code in WordPress. If you want, you can also paste the code from Header.php by going to the Theme Editor in the Appearance section.
But sometimes there is a problem in tampering with the code in WordPress, so you add the code through the plugin itself.
Conclusion: How to add Google Analytics to Blog
In this article, we have taught you to connect the blog to Google Analytics, so that you can measure the activity of every user visiting your blog. If you are still facing any problems in setting up Google Analytics for Blog, then you can tell us in the comment box below.
We sincerely hope that you must have liked this article written by us on How to Connect Blog to Google Analytics, you should also share this article with your blogger friends through social media.
You Can Read Also:
Backlinks -15 Amazing ways to make High Quality
Best Image SEO 2023 – How to make SEO Friendly Image?
Best Data Scientist Course | Salary | Fees in 2023
Best Way to Install WordPress in localhost XAMPP 2023


There is definately a lot to find out about this subject. I like all the points you made